Vim Configuration Guide: Building an Efficient Text Editing Environment
As a powerful text editor, Vim’s high customizability is one of its major strengths. By properly configuring the .vimrc file, we can significantly improve daily editing efficiency and create a personalized editing environment tailored to our habits. This article will detail common Vim configuration settings, best practices, and advanced features like automatically adding header information to script files.
I. Vim Configuration File Basics
1.1 Configuration File Location
Vim’s main configuration file is .vimrc, located in the user’s home directory:
- Linux/macOS:
~/.vimrc - Windows:
$HOME/_vimrcor$VIM/_vimrc
If the configuration file doesn’t exist, you can create a blank file to start configuring.
1.2 Basic Configuration Settings
Here are some common basic configuration items that can greatly enhance your editing experience:
" Basic editing settings
set tabstop=4                " Tab width as 4 spaces
set shiftwidth=4             " Auto-indent width as 4 spaces
set expandtab                " Convert tabs to spaces
set number                   " Show line numbers
set autoindent               " Auto-indent
set cursorline               " Highlight current line
set showmatch                " Highlight matching brackets
set hlsearch                 " Highlight search results
set incsearch                " Search as you type
set ignorecase               " Ignore case when searching
set smartcase                " Case-sensitive if search contains uppercase
set background=dark          " Set dark background
set encoding=utf-8           " Set encoding to UTF-8
syntax on                    " Enable syntax highlighting
set termguicolors            " Enable true color support

" Enable mouse
set mouse=a

" Set undo history size
set undolevels=1000
II. Automatically Adding Script Headers
2.1 Automatic Script Header Generation
When writing shell scripts, Python scripts, etc., adding standardized header information to files can improve code readability and maintainability. Vim’s autocmd feature allows us to automatically execute specified operations when creating new files.
Here’s an example configuration for automatically adding header information to Shell scripts:
" Automatically add header to new Shell script files
autocmd BufNewFile *.sh exec ":call ShellTitle()"

" Important: Function names must start with an uppercase letter, otherwise errors will occur
function! ShellTitle()
    call append(0,"#!/bin/bash")
    call append(1,"# **************************************")
    call append(2,"# *  shell function script template")
    call append(3,"# *  Author: Zhong Yixiang")
    call append(4,"# *  Contact: clockwingsoar@outlook.com")
    call append(5,"# *  Version: ".strftime("%Y-%m-%d"))
    call append(6,"# **************************************")
    call append(7,"")  " Add a blank line
endfunction
2.2 Function Naming Considerations
Important note: In Vimscript, user-defined function names must start with an uppercase letter, otherwise an E117: Unknown function error will occur. This is because Vim internal functions and commands use lowercase, and to avoid naming conflicts, user functions need to use names starting with an uppercase letter.
Error example:
" Error: Function name starts with lowercase
autocmd BufNewFile *.sh exec ":call shellTitle()"  " Error!
function shellTitle()  " Error!
    " Function content
endfunction
Correct example:
" Correct: Function name starts with uppercase
autocmd BufNewFile *.sh exec ":call ShellTitle()"  " Correct
function! ShellTitle()  " Correct
    " Function content
endfunction
2.3 Header Templates for Other Script Files
In addition to Shell scripts, we can create automatic header generation functions for other types of script files:
" Python script header template
autocmd BufNewFile *.py exec ":call PythonTitle()"

function! PythonTitle()
    call append(0,"#!/usr/bin/env python3")
    call append(1,"# -*- coding: utf-8 -*-")
    call append(2,"# **************************************")
    call append(3,"# *  Python function script template")
    call append(4,"# *  Author: Zhong Yixiang")
    call append(5,"# *  Contact: clockwingsoar@outlook.com")
    call append(6,"# *  Version: ".strftime("%Y-%m-%d"))
    call append(7,"# **************************************")
    call append(8,"")
    call append(9,"import os")
    call append(10,"import sys")
    call append(11,"")
endfunction

" JavaScript script header template
autocmd BufNewFile *.js exec ":call JavaScriptTitle()"

function! JavaScriptTitle()
    call append(0,"// **************************************")
    call append(1,"// *  JavaScript function script template")
    call append(2,"// *  Author: Zhong Yixiang")
    call append(3,"// *  Contact: clockwingsoar@outlook.com")
    call append(4,"// *  Version: ".strftime("%Y-%m-%d"))
    call append(5,"// **************************************")
    call append(6,"")
endfunction
III. Keyboard Mapping and Shortcut Configuration
3.1 Basic Keyboard Mappings
Vim allows us to customize keyboard mappings to improve editing efficiency. Here are some commonly used keyboard mapping examples:
" Define leader key
let mapleader = ","  " Can choose other symbols like space or comma

" Quickly exit insert mode
inoremap <C-j> <Esc>

" Map Ctrl+v to visual block mode
map <leader>v <C-v>

" Quick save file
nmap <leader>w :w<CR>

" Quick save and exit
nmap <leader>q :wq<CR>

" Quick exit without saving
nmap <leader>Q :q!<CR>

" Quick jump to end of file
nmap <leader>G G

" Quick jump to start of file
nmap <leader>gg gg

" Split screen related mappings
map <leader>s :split<CR>
map <leader>v :vsplit<CR>
" Use Ctrl+hjkl to switch between splits
map <C-h> <C-w>h
map <C-j> <C-w>j
map <C-k> <C-w>k
map <C-l> <C-w>l
3.2 Conditional Mappings
We can set different keyboard mappings based on file types to improve editing efficiency for specific types of files:
" Mappings enabled only for Python files
autocmd FileType python nmap <buffer> <leader>r :!python %<CR>

" Mappings enabled only for Shell scripts
autocmd FileType sh nmap <buffer> <leader>r :!bash %<CR>
IV. Theme Configuration and Recommendations
4.1 Recommended Vim Themes
It is recommended to use dark themes that are friendly to Shell syntax highlighting and have good contrast; common and effective ones include:
- gruvbox (warm colors with strong contrast, suitable for long reading sessions)
- dracula (vibrant, modern)
- nord (cool color palette, comfortable)
- solarized (available in light/dark versions)
- one or monokai (universal and widely supported)
4.2 gruvbox Theme Installation and Configuration
gruvbox is a retro groove color scheme heavily inspired by badwolf, jellybeans and solarized. Its main focus is to keep colors easily distinguishable, provide enough contrast, and remain pleasant for the eyes.
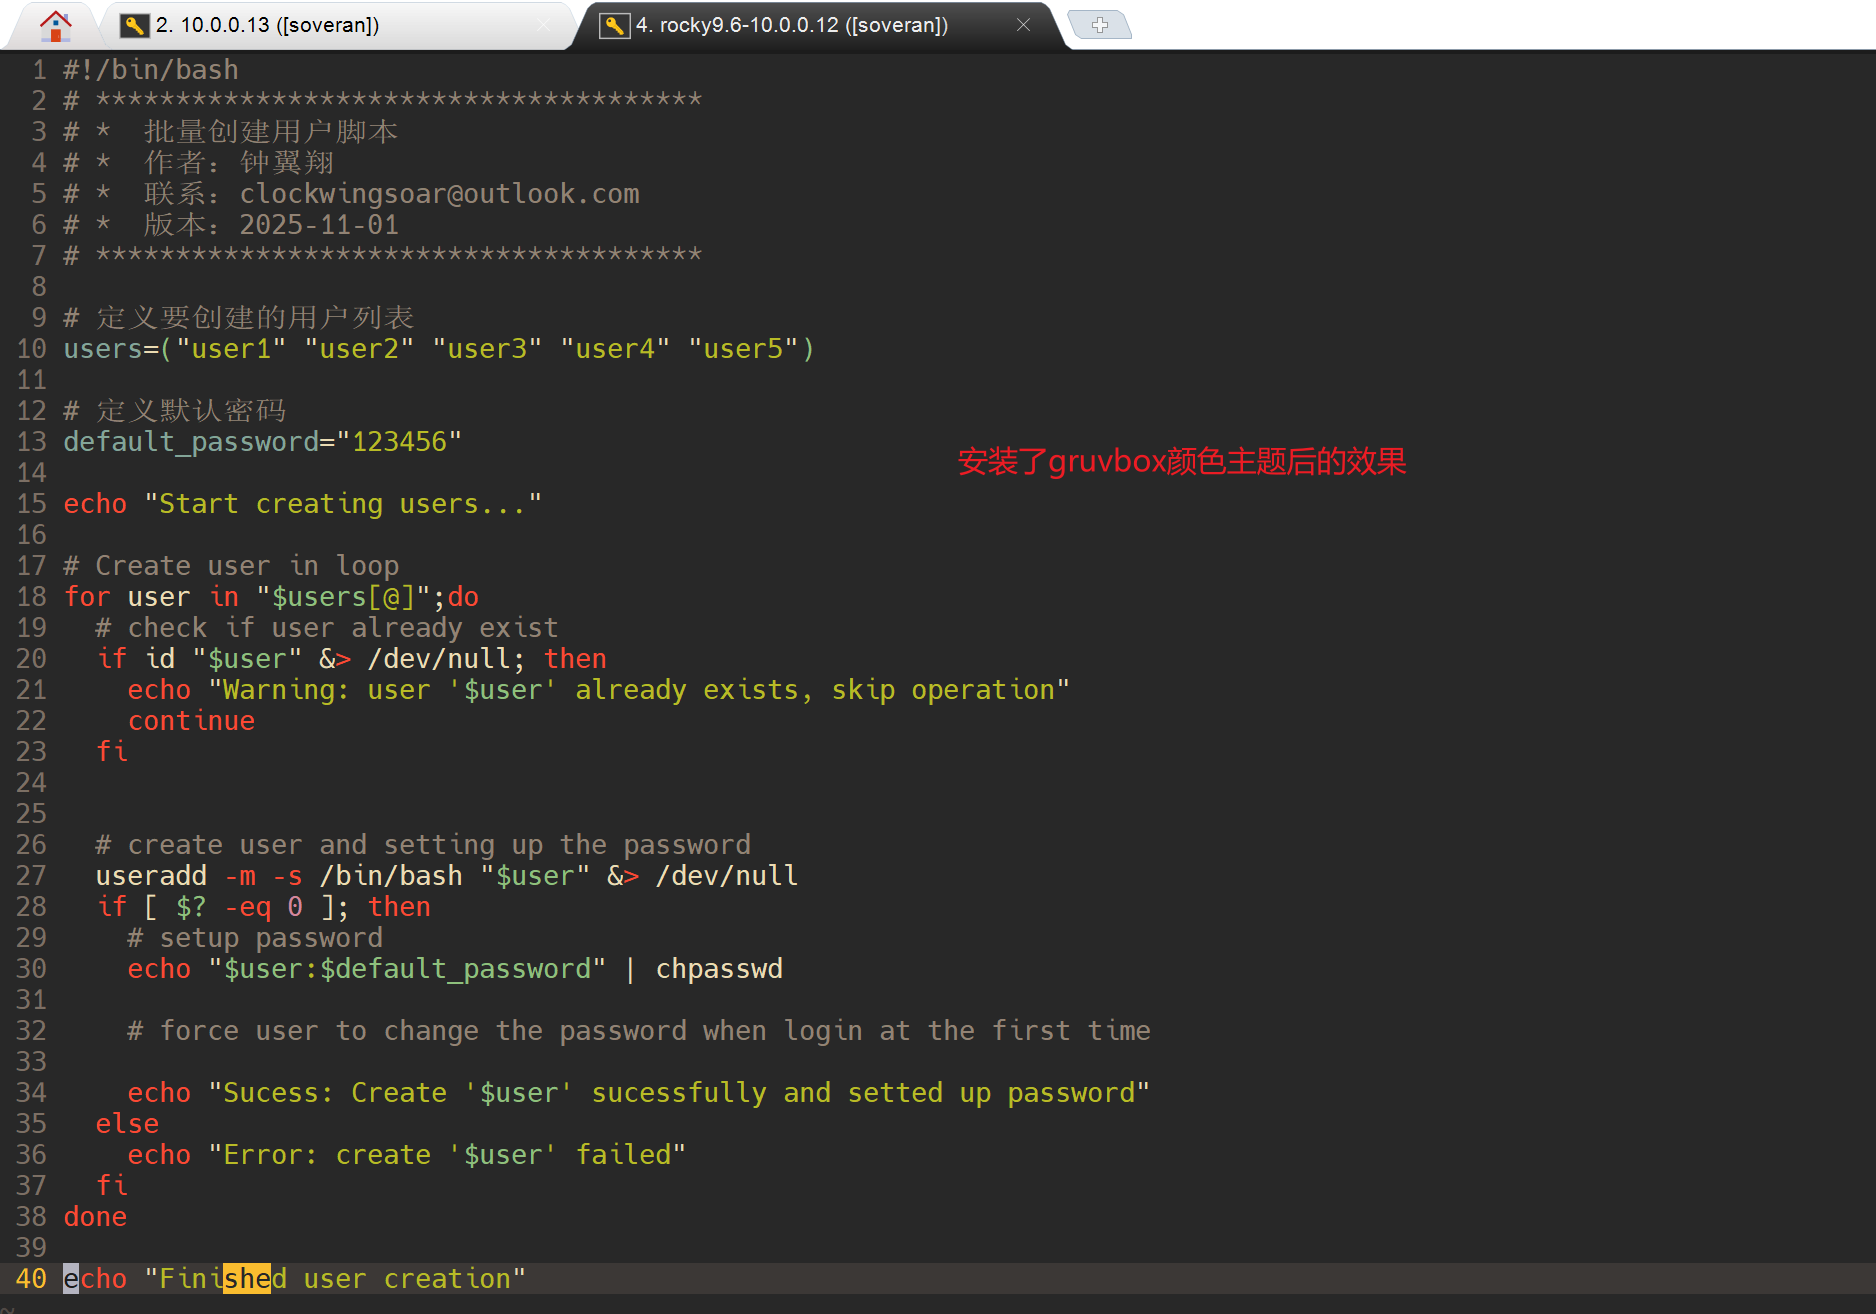
gruvbox theme display effect in Vim
Installation method (without plugin manager):
# Run in terminal (Linux)
git clone https://github.com/morhetz/gruvbox.git ~/.vim/pack/themes/start/gruvbox
Configuration method:
" Enable true color (if terminal supports)
set termguicolors

" Use gruvbox theme
colorscheme gruvbox
If your terminal supports true color, enabling termguicolors will give you the best results.
V. Advanced Configuration and Plugin Management
5.1 Plugin Manager Configuration
Before using a plugin manager, you need to install it first. Here are the steps to install the Vim-plug plugin manager:
5.1.1 Installing Vim-plug
For Linux/macOS systems:
# Install using curl
curl -fLo ~/.vim/autoload/plug.vim --create-dirs \
    https://raw.githubusercontent.com/junegunn/vim-plug/master/plug.vim

# Or install using wget
wget -qO- https://raw.githubusercontent.com/junegunn/vim-plug/master/plug.vim > ~/.vim/autoload/plug.vim
For Windows systems:
# Run in PowerShell
md -Force ~\vimfiles\autoload
Invoke-WebRequest -Uri 'https://raw.githubusercontent.com/junegunn/vim-plug/master/plug.vim' -OutFile ~\vimfiles\autoload\plug.vim
Once installed, you can configure Vim-plug in your .vimrc file. Here’s a configuration example:
" Vim-plug configuration - start
call plug#begin('~/.vim/plugged')

" Enhanced syntax highlighting
Plug 'sheerun/vim-polyglot'

" File browsing
Plug 'preservim/nerdtree'

" Code completion
Plug 'ervandew/supertab'

" Git integration
Plug 'airblade/vim-gitgutter'

" Color theme
Plug 'morhetz/gruvbox'

" Vim-plug configuration - end
call plug#end()
5.2 Plugin Configuration
Below are configuration examples for commonly used plugins, including NERDTree. For a comprehensive guide on using NERDTree, please see our dedicated article: Mastering NERDTree: A Comprehensive Guide to Vim’s File Explorer
Configure the installed plugins:
" NERDTree configuration
map <leader>n :NERDTreeToggle<CR>
let NERDTreeShowHidden = 1

" Color theme settings
" First install gruvbox theme (via plugin manager or manually)
" Manual installation:
" git clone https://github.com/morhetz/gruvbox.git ~/.vim/pack/themes/start/gruvbox
set termguicolors            " Enable true color
colorscheme gruvbox          " Use gruvbox theme

" NERDTree configuration
map <leader>n :NERDTreeToggle<CR>
let NERDTreeShowHidden = 1

" Automatically switch to the current editing file in NERDTree (improved version)
" Avoid triggering in NERDTree windows and non-regular files
" Use VimEnter event to ensure plugin is loaded
autocmd VimEnter * if !exists('t:NERDTreeBufName') || bufwinnr(t:NERDTreeBufName) == -1 | execute 'NERDTree' | endif

" Manual NERDTreeFind shortcut (recommended over automatic triggering)
nnoremap <leader>nf :NERDTreeFind<CR>

" Optional automatic find function (safer version)
function! s:OpenNERDTreeForFile()
    if &buftype == '' && expand('%') != '' && !isdirectory(expand('%'))
        try
            " Check if NERDTree is loaded
            if exists('*NERDTreeFind')
                " Check if NERDTree window already exists
                if !exists('t:NERDTreeBufName') || bufwinnr(t:NERDTreeBufName) == -1
                    execute 'NERDTree' . fnameescape(expand('%:p:h'))
                else
                    execute 'NERDTreeFind'
                endif
            endif
        catch
            " Ignore any errors
        endtry
    endif
endfunction

" Enable automatic find if needed
autocmd VimEnter,BufReadPost * call s:OpenNERDTreeForFile()
V. File Type Specific Configuration
5.1 File Type Detection and Indentation Settings
Vim can automatically adjust indentation settings based on file types:
" Enable file type detection
filetype on
filetype plugin on
filetype indent on

" Set indentation for specific file types
au FileType python setlocal expandtab tabstop=4 shiftwidth=4 softtabstop=4
au FileType javascript setlocal expandtab tabstop=2 shiftwidth=2 softtabstop=2
au FileType html setlocal expandtab tabstop=2 shiftwidth=2 softtabstop=2
au FileType css setlocal expandtab tabstop=2 shiftwidth=2 softtabstop=2
au FileType sh setlocal expandtab tabstop=2 shiftwidth=2 softtabstop=2
5.2 File Encoding Settings
Set appropriate encoding for different types of files:
" Global encoding settings
set encoding=utf-8
set termencoding=utf-8
set fileencoding=utf-8
set fileencodings=ucs-bom,utf-8,cp936,gb18030,big5,euc-jp,euc-kr,latin1
VI. Debugging and Troubleshooting
6.1 Common Errors and Solutions
6.1.1 Function Name Case Error
Error message:
E117: Unknown function: shellTitle
E193: :endfunction not inside a function
Solution: Change the first letter of the function name to uppercase, e.g., ShellTitle instead of shellTitle.
6.1.2 Plugin Loading Failure
Error messages:
E117: Unknown function: plug#begin
E492: Not an editor command: Plug
Solutions:
- Ensure Vim-plug is correctly installed:
# Linux/macOS systems curl -fLo ~/.vim/autoload/plug.vim --create-dirs \ https://raw.githubusercontent.com/junegunn/vim-plug/master/plug.vim - Restart Vim after installation
- Execute
:PlugInstallin Vim to install all plugins - Ensure there are no syntax errors in the plugin configuration section
6.1.3 NERDTreeFind Function Error
6.1.4 Mouse Setting Issues
Issue: When set mouse=a is enabled, you may encounter problems with copying and pasting text between Vim and other applications.
Explanation of set mouse=a:
- This setting enables mouse support in all Vim modes (normal, insert, visual, etc.)
- It allows you to use the mouse to move the cursor, select text, resize splits, etc.
- The issue occurs because Vim captures all mouse events, interfering with the system’s default copy-paste mechanism
Solutions:
- Use Vim’s own copy-paste commands:
- Copy:
y(yank) in visual mode - Paste:
p(put) in normal mode
- Copy:
- Selectively enable mouse functionality:
" Instead of enabling in all modes, enable only in normal and visual modes set mouse=n,v - Temporarily disable mouse:
- Execute
:set mouse=in Vim command mode - To re-enable:
:set mouse=a
- Execute
- Use terminal-specific solutions:
- For many terminals, holding down the Shift key while selecting text bypasses Vim’s mouse capture
- For Windows terminals, you might need to use specific key combinations
- Configure clipboard registers:
" Enable clipboard support if available
if has('clipboard')
    set clipboard=unnamedplus  " Use system clipboard by default
endif
Note: In the provided configuration file, this setting is commented out with a double quote: "set mouse=a.
Error messages:
E117: Unknown function: NERDTreeFind
Solutions:
- Ensure correct plugin installation: Execute
:PlugInstallcommand to ensure NERDTree plugin is properly downloaded - Check plugin path: Verify that NERDTree plugin files exist in the
~/.vim/plugged/nerdtree/directory - Modify autocmd trigger conditions: Use more precise autocmd configuration to avoid triggering in NERDTree windows and ensure the plugin is loaded:
" Automatically switch to the current editing file in NERDTree (improved version) " Avoid triggering in NERDTree windows and non-regular files autocmd VimEnter * NERDTree autocmd BufEnter * nested if winnr('$') == 1 && exists('b:NERDTree') && b:NERDTree.isTabTree() | quit | endif autocmd VimEnter,BufReadPost * call <SID>OpenNERDTreeForFileIfNotOpen() function! <SID>OpenNERDTreeForFileIfNotOpen() if !exists('t:NERDTreeBufName') || bufwinnr(t:NERDTreeBufName) == -1 " Not in NERDTree window if expand('%') != '' && !isdirectory(expand('%')) NERDTreeFind endif endif endfunction - Simplified configuration: If the above method still has issues, use a simpler configuration with manual NERDTreeFind trigger:
" Manual NERDTreeFind shortcut nnoremap <leader>nf :NERDTreeFind<CR> - Delayed loading: Use Vim’s
VimEnterevent instead ofBufEnterto ensure Vim is fully started before execution - Check plugin version: Ensure NERDTree plugin is up to date by executing
:PlugUpdate
6.2 Configuration File Debugging Tips
Check configuration syntax: Use
:source ~/.vimrcto reload the configuration file and see if there are any error messages.Temporarily disable configuration: Start Vim with
vim -u NONEto load without any configuration files.Test incrementally: Split the configuration file into multiple parts, add and test them incrementally to find the part causing the problem.
VII. Complete .vimrc Configuration Example
Here’s a comprehensive .vimrc configuration file example that integrates various settings introduced in this article:
"Shell脚本自动头部生成
autocmd BufNewFile *.sh exec ":call ShellTitle()"
function ShellTitle()
   call append(0,"#!/bin/bash")
   call append(1,"# **************************************")
   call append(2,"# *  shell功能脚本模板")
   call append(3,"# *  作者:钟翼翔")
   call append(4,"# *  联系:clockwingsoar@outlook.com")
   call append(5,"# *  版本:".strftime("%Y-%m-%d"))
   call append(6,"# **************************************")
   call append(7,"")
endfunction

"Python脚本自动头部生成
autocmd BufNewFile *.py exec ":call PythonTitle()"

function! PythonTitle()
    call append(0,"#!/usr/bin/env python3")
    call append(1,"# -*- coding: utf-8 -*-")
    call append(2,"# ******************************")
    call append(3,"# * Python功能脚本模板")
    call append(4,"# * 作者: 钟翼翔")
    call append(5,"# * 联系: clockwingsoar@outlook.com")
    call append(6,"# * 版本: ".strftime("%Y-%m-%d"))
    call append(7,"# ******************************")
    call append(8,"")
    call append(9,"import os")
    call append(10,"import sys")
    call append(11,"")
endfunction

" javascript 脚本头部模板
autocmd BufNewFile *.js exec ":call JavascriptTitle()"

function! JavascriptTitle()
    call append(0,"// *****************************")
    call append(1,"// * Javascript功能脚本模板")
    call append(2,"// * 作者: 钟翼翔")
    call append(3,"// * 联系: clockwingsoar@outlook.com")
    call append(4,"// * 版本: ".strftime("%Y-%m-%d"))
    call append(5,"// ******************************")
    call append(6,"")
endfunction


"基本编辑设置
set tabstop=4                " 制表符宽度为4个空格
set shiftwidth=4             " 自动缩进宽度为4个空格
set expandtab                " 将制表符转换为空格
set number                   " 显示行号
set autoindent               " 自动缩进
set cursorline               " 高亮当前行
set showmatch                " 匹配括号高亮显示
set hlsearch                 " 搜索结果高亮
set incsearch                " 边输入边搜索
set ignorecase               " 搜索时忽略大小写
set smartcase                " 当搜索词包含大写字母时区分大小写
set mouse=a                  " 启用鼠标
set undolevels=1000          " 设置撤销历史大小
syntax on                    " 启用语法高亮
set background=dark
set termguicolors            " 启用真彩色支持
colorscheme gruvbox          " 采用gruvbox颜色主题

" 定义领导者key
let mapleader=","
" 正常模式下快速保存并退出
nmap <leader>q :wq<CR>
" 正常模式下强制退出不保存
nmap <leader>Q :q!<CR>
" 插入模式下快速退出,切换到正常模式
inoremap <C-j> <Esc>

" 分屏相关映射
map <leader>s :split<CR>
map <leader>v :vsplit<CR>
map <C-h> <C-w>h
map <C-l> <C-w>l
" 这里是大写的J, 因为小写的j已经绑定了Esc
map <C-J> <C-w>j
map <C-k> <C-w>k

"仅对python文件启用的映射
autocmd FileType python nmap <buffer> <leader>r :!python %<CR>

"仅对shell脚本启用的映射
autocmd FileType sh nmap <buffer> <leader>r :!bash %<CR>

" 文件历史
set history=1000
" 正常模式下快速保存
nmap <leader>w :w!<CR>
" F3 快速插入无序列表ul标签
map <F3> i<ul><CR><Space><Space><li></li><CR><Esc>1i</ul><Esc>kcit
map <F4> <Esc>o<li></li><Esc>cit

"VIM plugin 配置开始
call plug#begin('~/.vim/plugged')

"语法高亮增强
Plug 'sheerun/vim-polyglot'

"文件浏览
Plug 'preservim/nerdtree'

"代码补全
Plug 'ervandew/supertab'

"Git集成
Plug 'airblade/vim-gitgutter'

"文件搜索
Plug 'ctrlpvim/ctrlp.vim'

" 状态栏
Plug 'vim-airline/vim-airline'
Plug 'vim-airline/vim-airline-themes'

" 快速导航
Plug 'easymotion/vim-easymotion'

" 格式化表格
Plug 'godlygeek/tabular'

"颜色主题
Plug 'dracula/vim', { 'as': 'dracula' }
Plug 'arcticicestudio/nord-vim'
Plug 'altercation/vim-colors-solarized'
Plug 'rakr/vim-one'
Plug 'sickill/vim-monokai'

"
"Vim -plug配置 - 结束
call plug#end()

" 主题切换函数
function! CycleTheme()
    if &background == 'dark'
        set background=light
    else
        set background=dark
    endif
endfunction

" 映射快捷键切换主题
nnoremap <leader>bg :call CycleTheme()<CR>

" 切换Solarized的暗色/亮色模式
nnoremap <leader>solarized :set background=dark<CR>:colorscheme solarized<CR>
nnoremap <leader>solarized_light :set background=light<CR>:colorscheme solarized<CR>

"NERDTree配置
map <leader>n :NERDTreeToggle<CR>
let NERDTreeShowHidden = 1


"启用文件类型检测
filetype on
filetype plugin on
filetype indent on

" 为特定文件类型设置缩进
au FileType python setlocal expandtab tabstop=4 shiftwidth=4 softtabstop=4
au FileType javascript setlocal expandtab tabstop=2 shiftwidth=2 softtabstop=2
au FileType html setlocal expandtab tabstop=2 shiftwidth=2 softtabstop=2
au FileType css setlocal expandtab tabstop=2 shiftwidth=2 softtabstop=2
au FileType sh setlocal expandtab tabstop=2 shiftwidth=2 softtabstop=2

"全局编码设置
set encoding=utf-8
set termencoding=utf-8
set fileencoding=utf-8
set fileencodings=ucs-bom,utf-8,cp936,gb18030,big5,euc-jp,euc-kr,latin1
VIII. Conclusion
By properly configuring the .vimrc file, we can transform Vim into an efficient, personalized text editing environment. This article has introduced Vim’s basic configuration, automatic script header generation, keyboard mappings, plugin management, and other important content, with special emphasis on function naming considerations.
Configuring Vim is an ongoing optimization process. It’s recommended to gradually adjust and improve the configuration according to personal usage habits and needs. As you accumulate experience, you’ll find that a well-configured Vim can greatly improve daily text editing efficiency.
Finally, remember that while Vim has a steep learning curve, the rewards after mastering it are enormous. Keep practicing and exploring, and you’ll be able to fully utilize the potential of this powerful editor.
文档信息
- 本文作者:soveran zhong
- 本文链接:https://blog.clockwingsoar.cyou/2025/11/01/vimrc-configuration-guide-en/
- 版权声明:自由转载-非商用-非衍生-保持署名(创意共享3.0许可证)